Sunday, September 8, 2019

Fallingwater, Running Water, and a Downpour: Ohiopyle, Pennsylvania


A few weeks ago we took the Shasta on a family camping trip Ohiopyle, PA. We have had never been to this area before and have had it on our list of places to visit for a very long time. We had been given a heads-up that roads into Kentuck Campground all have some considerations when towing a trailer. Dunbar Road that we took in from the north was very narrow and windy through the woods, this normally wouldn't have caused much concern for us but when we got to this stretch of road it was getting dark and quickly turning into a severe downpour. We found our site and all worked together to get the Shasta leveled and set-up while it was raining as hard as you've ever seen. Dinner was cooked outside on our Coleman stove under an umbrella, one of the few times we really wished we had a Stove in the camper. The rain finally stopped about the time our heads hit our pillows. The next morning and for the for the rest of the trip the weather was beautiful, even though this campground is quite large we found it to be quiet during the week and there are nice trails for hiking that start near the sites. For most visitors the biggest draw in Ohiopyle is white water rafting & paddling, with guides that cater to large groups and a small town that is all about rafting. We didn't do any paddling as we prefer flat water, but did enjoy watching boats navigate the rapids from a hike in the Ferncliff Nature Area. There's also a lot of bicycling here, the 130 mile long Great Allegheny Passage is a rail trail goes right through town and there's lots of things that cater to those passing through on bikes.

For us the big draw was to check out Frank Lloyd Wrights Fallingwater. We are fans of FLW's  architecture and have vistited a bunch of his sites around the country.  Fallingwater is now easily one of our favorites and we left feeling like our next house will definitely be in the woods with lots of glass. The building is quite amazing and in the 1930's when it was built it must have seemed unbelievable. Another of my big take-aways was to not be afraid to explore custom solutions to get what you really want, the number of small hand-made details to make things work the way the architect or owners wanted in this house is amazing. As a bonus we also toured a 2nd FLW house called Kentuck Knob that is really close to the state campground. Kentuck Knob was designed and built about 20 years later in the 50's and is is being referred to as a FLW Grand Usonian style, being similar but larger than his typical Usonian houses. Kentuck Knob was also inspiring and well worth checking out if you are in the area.


Monday, August 5, 2019

Disassembling the Bathroom


I've been making progress on the start of the renovation of the bathroom. Beginning with careful disassembly over a few weekends, and now cardboard markups of how it might go back together. It's amazing how many parts came out of such a small space int eh back corner of the camper. We've decided to go with a typical RV toilet with a black tank and also to add a grey tank. I've looked at a bunch of options and am having a new black tank custom built to fit into the same space above the main floor under the toilet as the original. For a grey tank I'm working on  a design for how it can sit below the floor inside the fiberglass valence on either the right or left side, it's tricky because the shower drain is so low, but I think it's workable. I'm planning to re-use the shower pan, but loose the large fiberglass surround that was behind the toilet to help the bathroom feel less crowded. I also recently got a new Valterra waste valve with Black and Grey gates to replace the old broken Thetford valve, a collection of 1 1/2" diameter ABS elbows and T's for the drain lines, and some 3/8" diameter PEX to start routing the water supply lines.


Saturday, May 18, 2019

Larger Roof Hatch


When checking out new campers at the RV Show this winter one of the things that stood out to me was that many of the windows in modern campers are also emergency escape hatches. Lots of rigs also have roof escape hatches as well. For our Avion we are thinking of installing a larger hatch in the ceiling over the bed in the cab-over area which can serve as an escape hatch.  If we use a clear hatch cover it will also give us a view of the night sky and let a lot more light in to brighten up the interior.

I've been looking at options made for RV's and boats and think that a relatively new model made by Tern Overland is what's right for us. I believe that this hatch will be fit in-between the structural ribs so I won't have to make structural modifications related to the overall integrity of the camper.  There are also a few options made by Dometic including the huge Heki 2 which could be quite spectacular, but would involve more structural work than I'd like for this modification. Interestingly, two other Avion truck camper re-builds have recently installed larger roof hatches, so there's some good references to see options and what's invoiced.  RoamLab installed the same Arctic Tern hatch that we think is good for us, and 1965 Avion C-10 built his own escape hatch from scratch!  I've got some other things to focus on before ripping into this further but I think it's going to be a great feature.


Saturday, April 13, 2019

from 3 to 4 Jacks


Like many truck campers of this vintage our Avion only has 3 jack stands instead of 4 as is more common today.  My guess is that cost and weight were two reasons why only 3, but if you look at photos of 60's & 70's truck campers you'll notice that many have at least a slight "crinkle" in the side wall just above the single-side jack. The jacks are intended for use when loading and unloading, but not as the sole support for long-term storage or habitation when off of a truck.  My assumption is that the "crinkles" happen when there is too much activity inside the camper when it's off the truck, or maybe the structure just gives way over time from too much stress on that one point, maybe even from extra load from wind gusts during storms.  I've also seen several photos where it's obvious that a camper was mounted to a truck and had its jacks down when the truck moved.  Our C10 has one of these "slight" crinkles, and while it seems structurally OK, we've decided to add a 4th jack and relocate the one thats there now. I've also noticed from photos that most other Avion's have the jacks mounted farther outward, so that when the jack is swung up for traveling it sits outside the exterior wall of the camper. On ours, the jacks are flush with the outer wall when swung to the up position. I don't know if this was a "running change" in Avion production but am pretty sure that we will want to (or maybe have to) move our jacks out further to have better clearance for a truck bed. This is a little complicated since our brackets have a flange that extends outward which may need to be cut, or I may end up replacing the brackets with new ones that don't have that flange. Our jacks themselves clean-up very well and function fine, so at the moment I'm thinking that I'll try to find a matching 4th vintage jack and bracket.

Saturday, April 6, 2019

Turning the Bed


We've been making plans about what to restore and what we might modify with the Avion. In general we are thinking that we will restore the outside to preserve it's vintage appearance, but for the interior we are considering some changes to improve its function specific to how we think will use it. One major element we have been working on is turning the bed 90 degrees so either one us can get in and out without climbing over the other. The cab-over area on Avion C-10's & C-11's is pretty short which makes turning the bed fairly complicated. The folks over at RoamLab did an amazing job extending the cab-over of their C-11, but we are looking at a way to do this without modifying the structure.

I drew up a bunch concepts, then built a simple full-size cardboard mock-up of an approach that I think will work. The bed basically overhangs the dinette by about 24" and likely will need to be supported by two legs that can attach to the dinette seat base.  If I keep the bed length to around 75" (same as a Full size mattress) there is just enough room for two to sit at the un-covered portion of the dinette. When we want to use the full dinette, the 24" section of mattress lifts up and slides over the main mattress into the cab-over area, and the 24" support panel slides-in under the main section of mattress. Our thought is that when traveling and just stopping for one night we'd likely leave the bed "out", but when camping in one place for a while we would put the bed in if we wanted to hang-out inside the camper due to weather or whatever. This design also lets us keep the existing cab-over storage cabinet for clothes) and we can add another storage area of similar size on the opposite side while still having ample room around the bed. To ease getting in & out of the bed I'm thinking about a plank-style step thats supported by the dinette base. I've got a couple of ideas for how this plank step can stow away when not in use, and also some ideas for tricks with the dinette table that will help with all this come together. I'll have to get into actually building it to work out a bunch of details, but I am feeling good that this approach.


Sunday, March 3, 2019

Winter Research

It's been pretty cold, so most of the work on the Avion has been pretty limited. I've definitely spent more hours digging around on the internet than any actual work on the camper.  One thing that we found worthwhile was an afternoon stomping around in the snow (and indoors) at a local RV Show to check out what's going on in the world of new RV's. While there's some pretty cool things happening with new campers of all sizes, this visit confirmed that "vintage" is still the right thing for us. Besides how much we've enjoyed spending time at TCT rallies with our Shasta, we just really like the old materials and aesthetics of campers from the 50's and 60's. The show also helped provide a reality check, as the price of new campers helped us realize that some of the components that we might want to purchase for the Avion are not so expensive after all. There were only a few Truck Campers at the show, but we did come back home with some ideas and good insights that will help a lot with the Avion.


Sunday, January 27, 2019

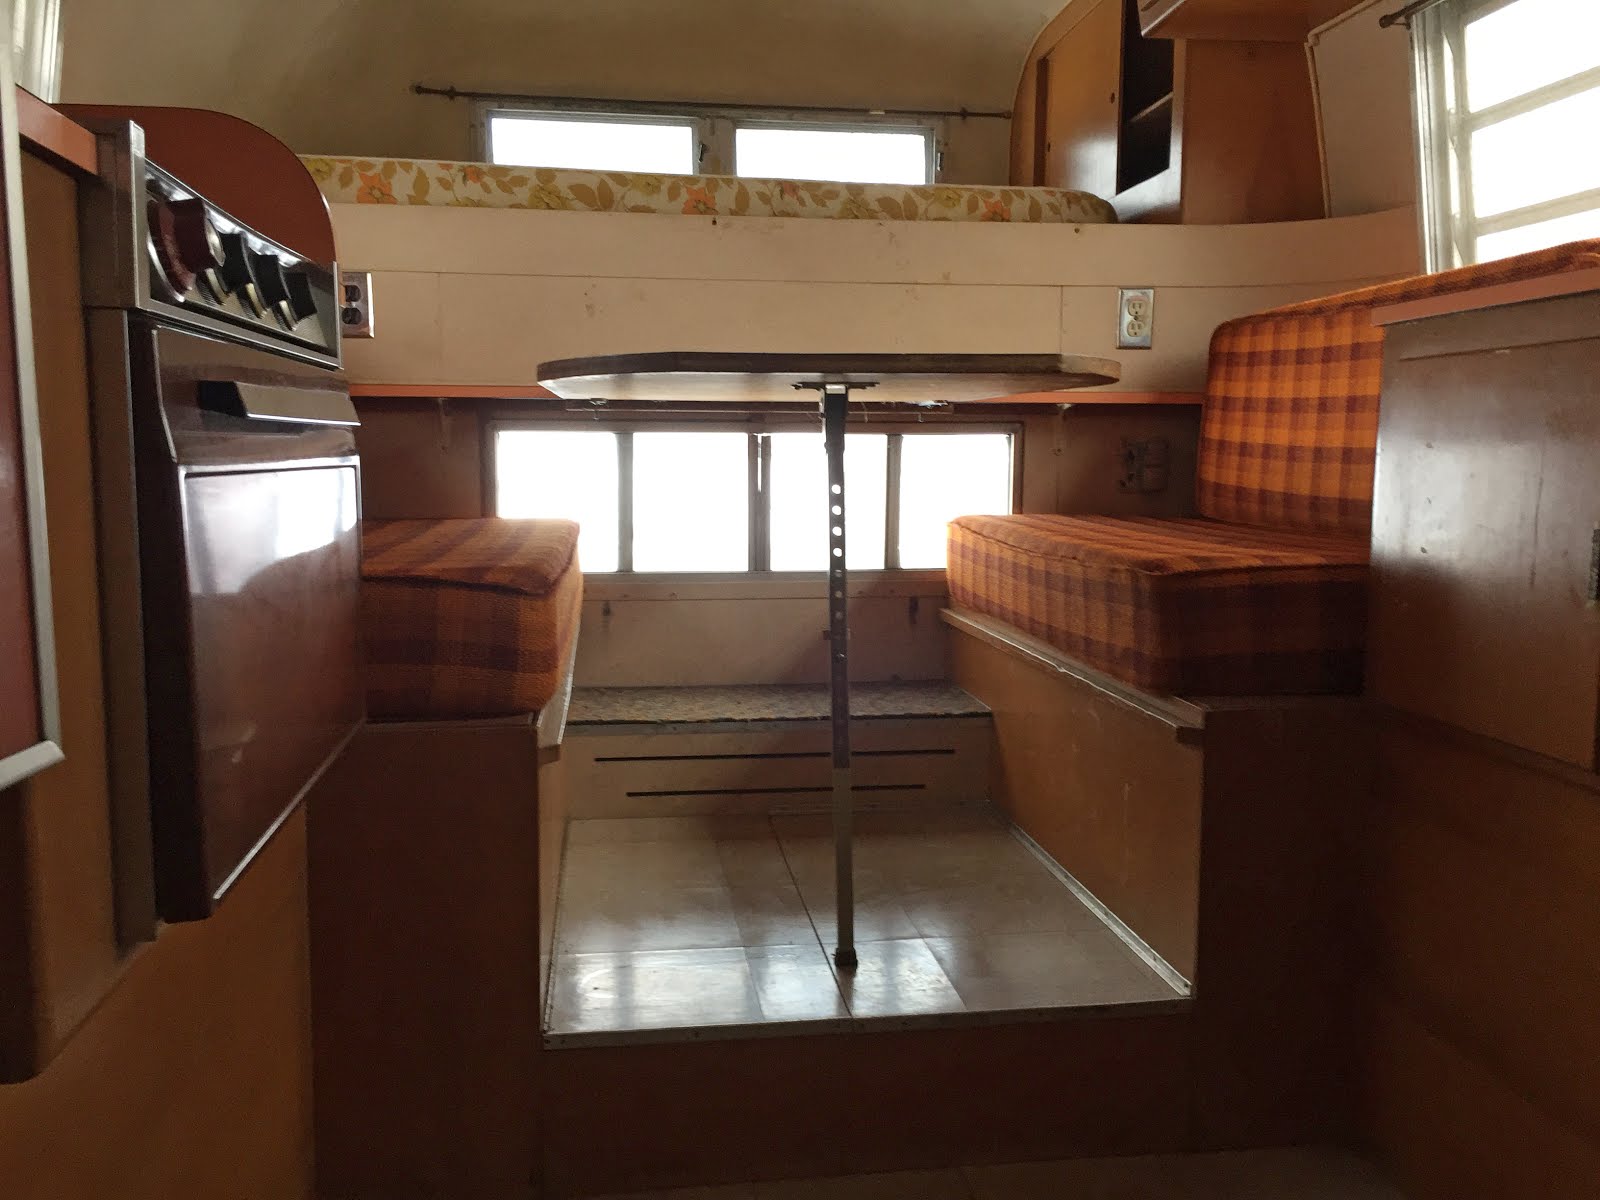
Inside the Avion C-10 Truck Camper


What's inside of our Avion C10?
Overall it's in pretty good condition, especially compared to other 50 year old truck campers and maybe 50 year old campers of any type.  It's a Center Dinette model which doesn't seem to be as common as the Side Dinette layouts that seems to be in most of the Avion truck campers I see around the internet. All the original appliances are there except for the hot water heater and toilet which have been removed by a previous owner. The dinette table drops down and the seat cushions can be arranged to make a second bed. There is very little evidence of any water damage, just a little at one corner of the front window. The floor seems to be pretty solid except for a few inches that that will need attention just inside the door, and the wood door threshold itself will need to be replaced. Our first impression is that it has a lot of storage areas for its size, especially in the overhead cabinets and a wardrobe of sorts in the cab-over bed area.  There are also deeper storage areas under the dinette seats and a "compartment" that reminds me of the ones in the Millennium Falcon in the dinette floor that would be good place for a toolbox or heavy cast iron pans. The woodwork is not banged up but will need to be refinished, in a few few places some of the cabinet veneer will need some attention. The original speckled interior wall paint is intact but fairly dirty, once it's warm enough to work outside we will have to see how it cleans up to decide what happens with it.